How to Make an Employee Schedule in Excel (+ Templates)
Learn how to make a work schedule in Excel, download 7 free Excel schedule templates, and discover a better solution for employee scheduling.

In this post, we’re going to walk you through an eight-step process for how to make a schedule for employees in Microsoft Excel. We’ll also share a few free Excel templates you can use to get started and highlight some of the benefits and disadvantages of using Excel for creating employee schedules.
Buddy Punch makes employee scheduling easier than ever. Build schedules quickly with our drag-and-drop builder, create recurring shifts for employees who work the same schedule each week, assign employees to work at specific locations, see employee availability while you’re building schedules, send employees notifications when a new schedule is published, allow employees to trade shifts, and much more.
The benefits of using Excel for employee scheduling
Creating employee schedules in Excel has three big benefits:
- Making a work schedule in Excel is easier and faster than making one with pen and paper. You can easily undo mistakes, copy and paste values from one cell into another, and use each week’s schedule as a template for future weeks.
- Using Excel to create employee schedules is free if you are also using Excel for things other than employee scheduling. If you were planning to pay for an Excel subscription whether or not you create employee schedules with it, there’s no additional cost to use it for scheduling.
- Excel spreadsheets can be shared with employees as a link, so you don’t have to field calls from employees asking about their schedules. They don’t need to come to work or call you to find out when they’re scheduled for future weeks.
The disadvantages of using Excel for employee scheduling
Creating employee schedules in Excel also has a number of disadvantages:
- What you save on costs you’ll lose in time. The cost-benefit analysis is more nuanced when you factor in how much time you spend making a work schedule in Excel versus how much faster you could make schedules using dedicated employee scheduling software.
- You may make scheduling mistakes. It can be difficult to keep track of every employee’s availability, preferences, and scheduled time off when creating schedules in Excel. You may have to create and reference multiple tabs and documents to keep track of everything you need.
- The most helpful features often require advanced knowledge of Excel. If you’re an Excel pro, you can create a master sheet for all of your employees and then automatically populate other role- or location-based sheets using the details from the master sheet. But it will take a lot of time to learn how to do that, and one tiny typo can break your entire workflow.
- Excel doesn’t offer helpful scheduling features. You won’t be able to notify employees automatically when their schedules change, let employees request shift trades with one another, or let employees change their availability on their own.
For some teams, these issues are not a deal-breaker. For other teams, it’s much cheaper and more efficient to use scheduling software. If that sounds like you, you can try Buddy Punch’s employee scheduling software for free for 14 days.
How to make a schedule for employees on Excel in 8 steps
Follow these step-by-step instructions to make a schedule for employees in Excel without having to look up additional Excel tutorials. These are general instructions to show you the fastest way to make a schedule.
1. Create a new file

Open a new Excel workbook and give your file a name like “Employee Schedule: ##-##-## to ##-##-##” to make it easy to find historical schedules. If you’re using a desktop version of Excel, save the file, and keep saving after each step to avoid losing your work. If you’re using Excel on the web, it will auto-save your progress regularly.
2. Create a header
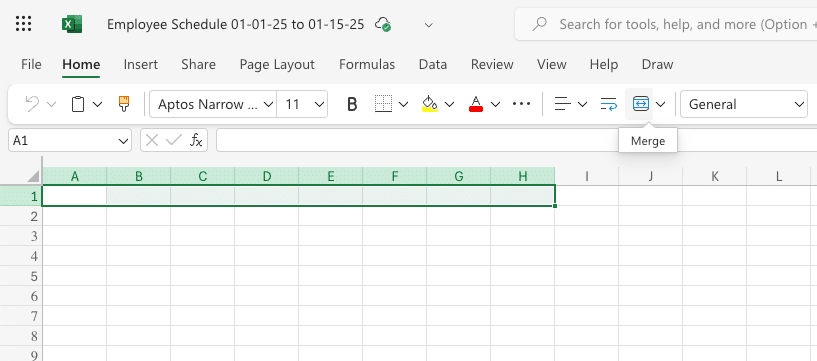
In row 1, select the number of columns you’ll need, then click the “Merge” button to turn all of those cells into a single cell. Type in the name of your schedule to create a header. You might also want to increase the font size of the header, add a color background, or add a border around it to make it stand out.
3. Add date headers to the columns in row 2
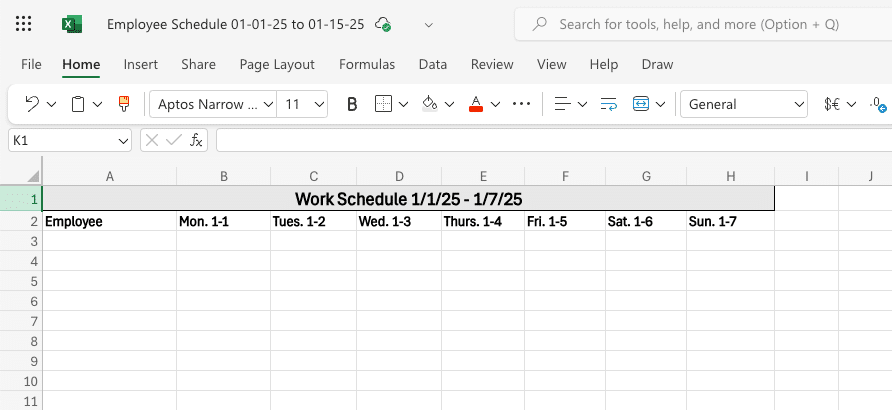
Your first column should be called “Employee” since you’ll list all employee names in that column. The following columns should list the individual days and dates that your schedule is covering.
4. Add your employees’ names to the first column
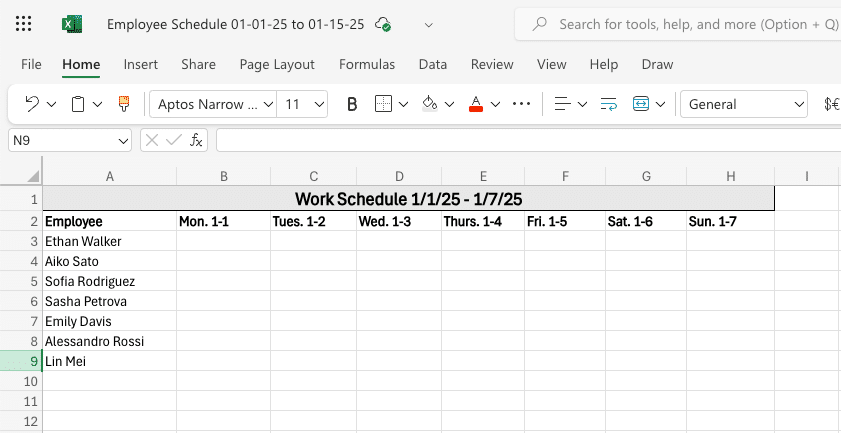
In column A, list the names of all of your employees. If you have multiple locations, you can also create sections for your different locations and list the names of employees who work at those locations under those sections. If employees work in different roles, you can also create sections for roles, or add another column to the right of the employee’s name where you can specify their role.
5. List the hours each employee will work
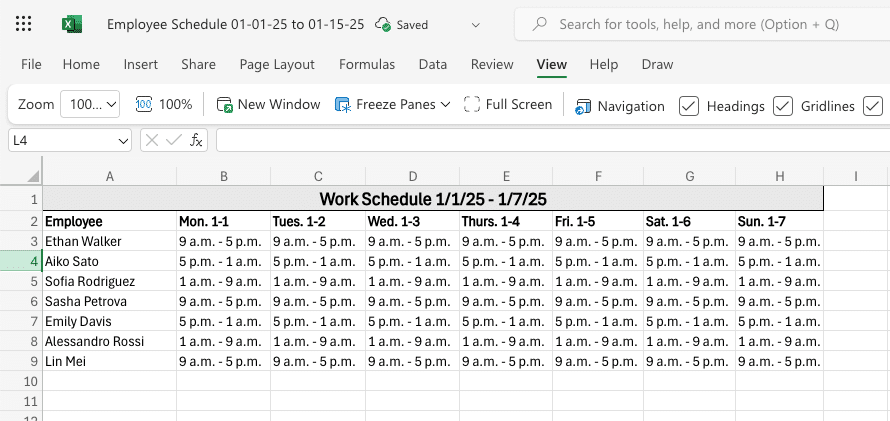
At this point, you can actually start creating your schedule. For each day on your schedule, list the times you want each employee to work that day. If your times are wider than the column, you may need to adjust the width of the column to get all of the text to display on a single line. You can also specify when an employee is off or when they’re taking PTO on the schedule.
6. Add some visual appeal to your schedule
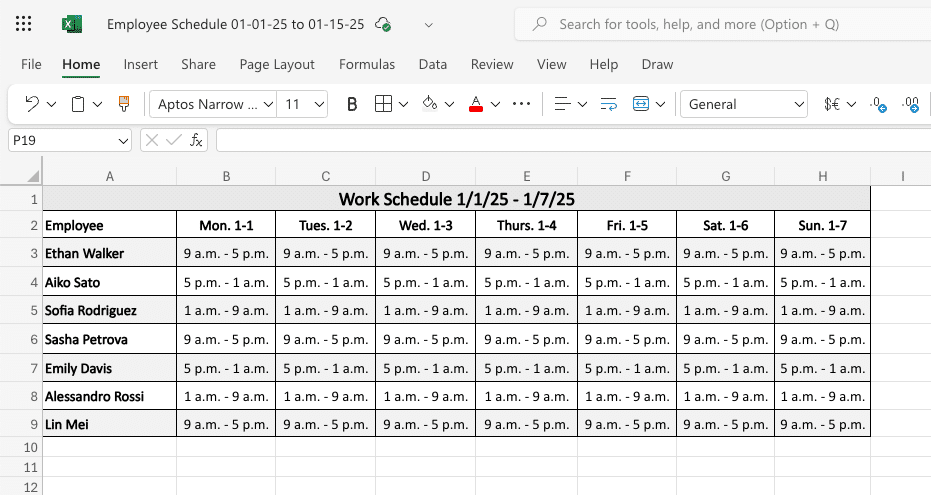
Now that you’re finished scheduling, you may want to make your schedule more visually appealing. You can add alternative background colors to rows to make it easier for employees to follow the line with their schedules, bold employee names so they’re easy to find, change the font to a more readable option, and center the dates and times columns to create more whitespace between entries.
7. Make sure your schedule will print on a single sheet of paper
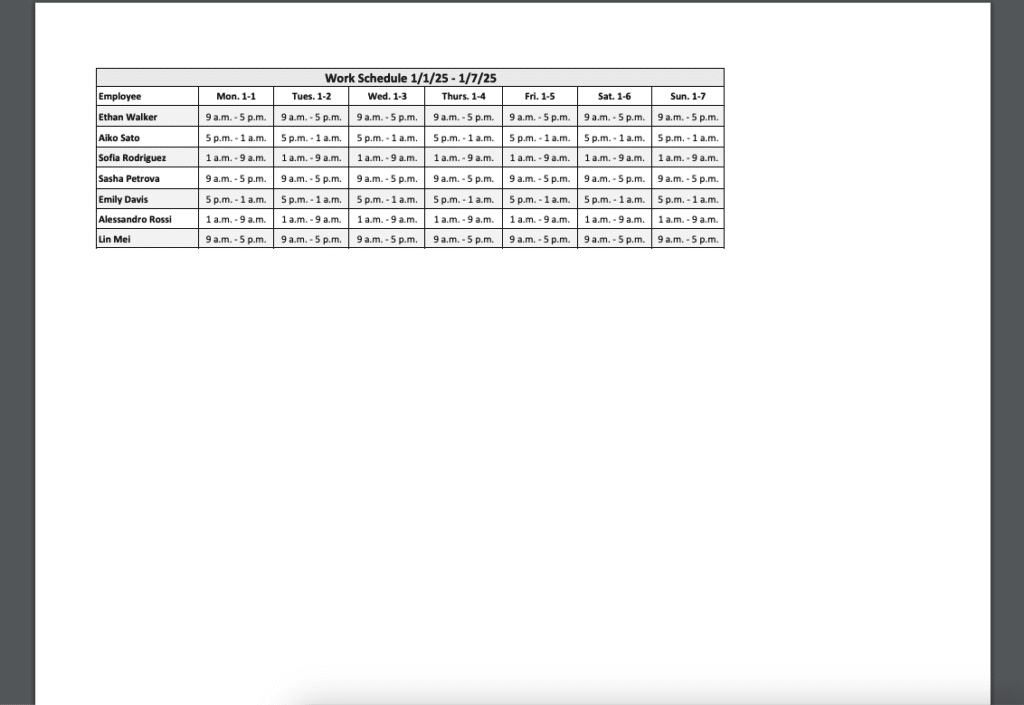
If you’re planning to print your schedule to hang it up at work, you’ll want to make sure that it can be printed on a single sheet of paper. Go to “File” –> “Print” and view the preview to make sure none of your schedule is getting cut off in odd places. If it is, you may need to adjust the design to get everything to print nicely on a single sheet of paper.
8. Distribute the finished schedule to your employees
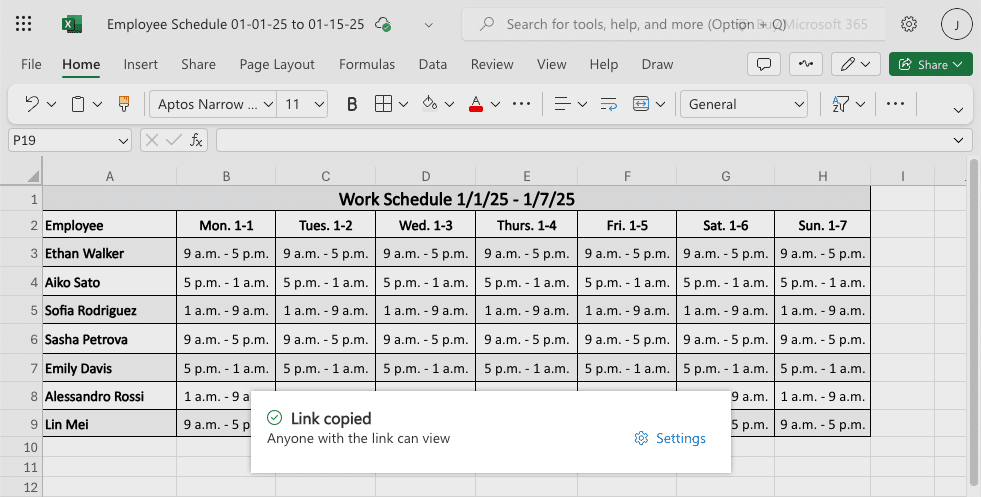
Once your schedule is finalized, you can share it with your employees. You can:
- Print it and hang it in the break room or another central location.
- Download the file and email it to your employees.
- Create a shared link and send the link to employees (if using Excel online).
To create a shared link, click the “Share” button, then select “Copy Link.” By default, Excel will set the permissions for the link to “Anyone with the link can edit” — you want to make sure to change this so employees can’t make changes to your schedule. To do so, click “Settings,” then under “More Settings,” click the dropdown and select “Can View.” This lets employees view the schedule but not edit it.
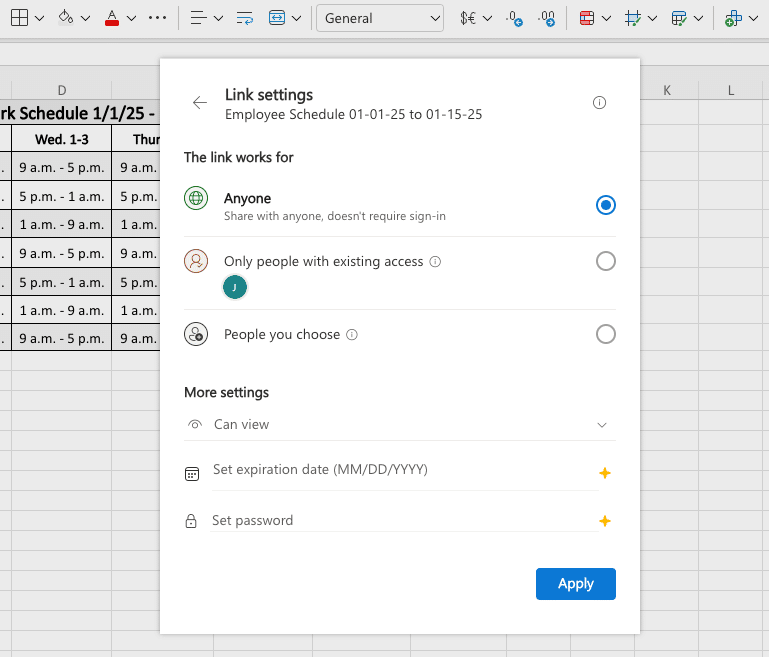
When that’s done, click “Apply,” then copy the link Excel provides. You can email that to your employees so they can view the schedule online at any time.
Related: You might also like our guides on how to make an employee schedule in Google Sheets and how to create an employee schedule in Google Calendar.
Free employee schedule templates for Excel
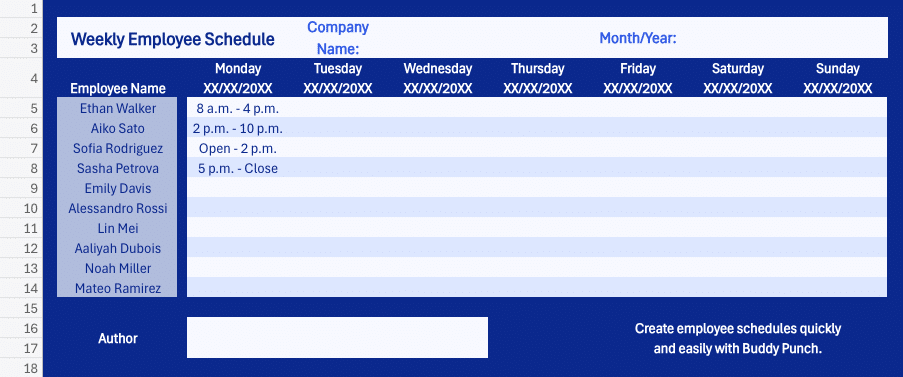
If you don’t want to bother creating an employee schedule in Excel from scratch, have more complex schedules than what’s covered above, or want something that’s already designed for you, click the links below to download our free work schedule templates for Excel:
- Monthly employee schedule template – If you create monthly schedules for your employees, use this template to easily get your entire schedule for the month printed on one sheet of paper.
- 24 hour schedule template – If your business operates 24 hours a day, use this template to schedule employees weekly across all 24 hours of each day.
- 7-day weekly work schedule template – If you just need a basic weekly work schedule, this template is the right choice for you.
- Employee shift schedule template – If you want to schedule employees for specific shifts (e.g., first, second, third), use this template to create a weekly schedule that’s broken out into shifts.
- Job schedule template – If your employees work on specific jobs or projects, use this template to specify not only when they’ll work but also what specific projects you’ve assigned them to work on.
- Schedule template for multiple positions – If your employees rotate between different positions, use this template to let employees know when they’re working and what position they’re filling.
- Daily employee schedule template – For trade businesses where employees work at different locations each day and may not be planned in advance, this daily schedule template will let you create a schedule for employees each morning that specifies what jobs they’re working on that day.
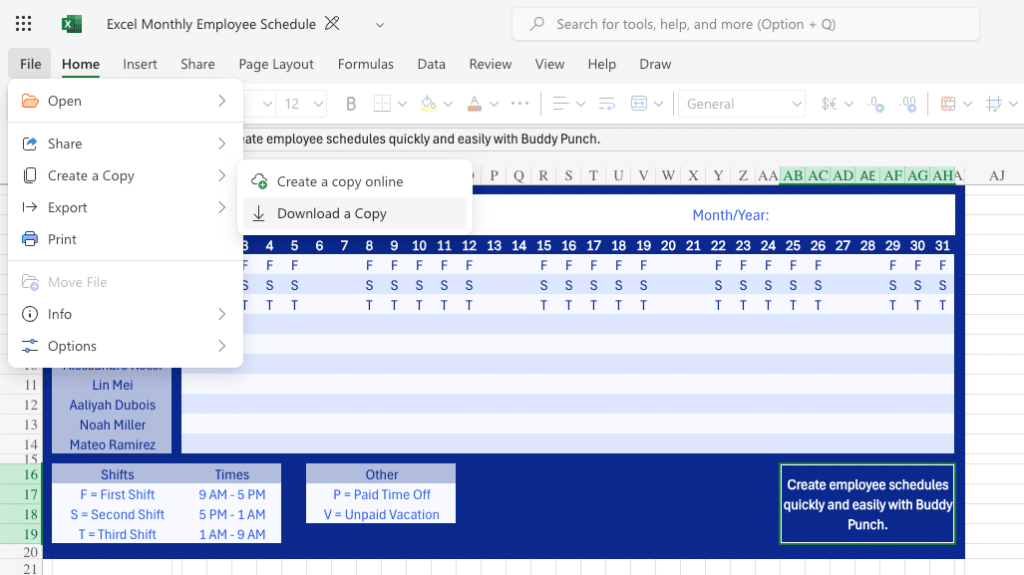
You’ll only be able to view these templates — not edit them. To edit them, you’ll need to either make a copy of them or download the file and upload it to your own Excel account. To do either, click “File,” hover on “Create a Copy,” then select either “Create a copy online” or “Download a Copy.”
Simplify your employee scheduling with Buddy Punch
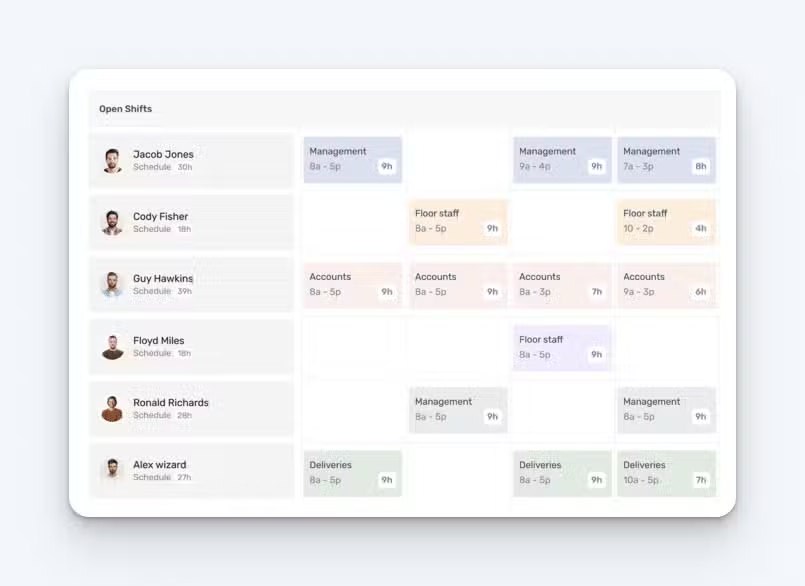
Buddy Punch is an employee scheduling app that’s user-friendly, has high customer satisfaction ratings, and comes with all of the features you need to create schedules quickly.
Buddy Punch’s scheduling tool displays all of your employees in one column and the days you’re creating a schedule for in subsequent columns. To create a shift, simply click in an open area, specify the shift’s start and end times, and add any employees you want to work that shift.
Repeat this for all of the days your schedule covers, then publish your schedule. Your employees will receive notifications that the schedule is live, and they can view their schedule at any time in the Buddy Punch app, which is available on the web and has mobile apps for both iOS and Android devices.
If your scheduling is simple, that’s all you’ll ever need to do. However, Buddy Punch’s scheduling tool also has all of the advanced features you need to create more complex work schedules.
Locations
Buddy Punch’s locations feature lets you assign locations to shifts so employees know not only when they’re working but also where. Your schedule can also be filtered by location so you can build schedules for each location quickly and easily, and different locations can be assigned different colors so you can quickly see where everyone will be working at a glance.
Departments
If you have employees working in different roles — such as server and host — you can create those different roles as departments in Buddy Punch. After that, you can assign the appropriate department to shifts so employees know when they’re working, where they’re working, and what position they’re filling.
Repeating shifts
If your employees work the same hours every day, every week, you can create repeating shifts to automatically add shift templates to future weeks. The future shifts won’t be published until you push the publish button for the schedule they apply to, but it gives you a big head start on creating future schedules.
If you do need to shift something around on a future schedule, that’s easy too. Buddy Punch’s drag-and-drop functionality makes it easy to move shifts to different days and times.
Employee availability
Nothing is more frustrating than working hard on your schedule, publishing it, finding out that an employee isn’t available to work on a day you scheduled them for, and having to start over.
With Buddy Punch, you’ll never run into this issue again. Employees can specify their availability in the app, and times when employees aren’t available show up on your calendar view. Plus, if you try to schedule an employee when they’re unavailable, the system will give you an error message and prevent publishing the schedule.
Shift trades and covers
When an employee can’t make their scheduled shift, either the employee or an admin/manager can open that shift up to be covered. You can select who should receive the cover request, and if another employee accepts it, the schedule adjusts automatically.
Additionally, when employees work out amongst themselves that they want to trade shifts, they can make that request in Buddy Punch. The request then goes to a manager or admin to be approved before the schedule adjusts.
Scheduling and much more
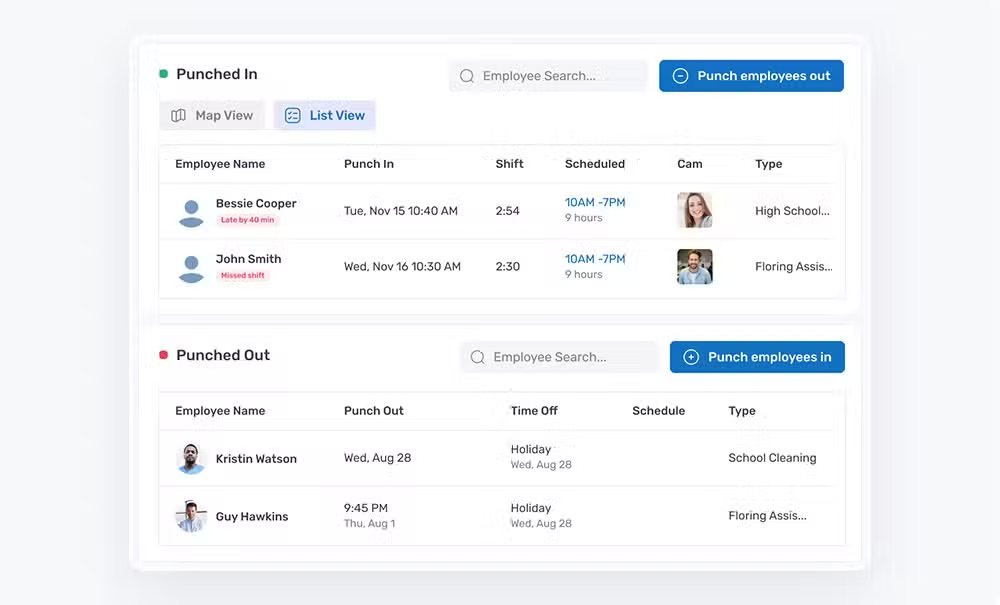
While Buddy Punch makes creating work schedules easier than ever, that’s not all it can do. It’s also one of the best time card apps. It compiles timesheets for you automatically, makes running payroll easier, and keeps your employees accountable with features like:
- Clock in/out reminders: If your employees haven’t clocked in or out within a certain amount of time after their shift starts or ends, Buddy Punch will automatically send them a reminder to clock in/out.
- Limit early/late punches: You can prevent employees from clocking in before their shift starts or automatically clock them out at the end of their shifts to prevent unplanned overtime and unexpected labor costs.
- Geofence time tracking: Prevent employees from clocking in or out when they’re not on-site by creating geofences. If employees try to punch when offsite, the system will block the action.
- Photos on punch: If you’re concerned about buddy punching — where employees clock in and out for each other — you can require employees to take a selfie when they clock in and out. Those photos can be reviewed on their timecards.
- Payroll integrations: Buddy Punch integrates with popular payroll providers like QuickBooks, ADP, Workday, Gusto, and more, letting you transfer your time data to payroll in seconds and run payroll more quickly than ever before.
There are lots of additional features available in Buddy Punch beyond what we’ve covered here, and you can use them all or just the ones you need. View a complete list of Buddy Punch’s features.
Learn more about Buddy Punch
- Start a free trial — no credit card required
- View pricing
- Watch a video demo
- Take an interactive product tour
- Request a personalized demo


