
The 9 Best Time Clock Apps for Small Businesses

Written By: Eric Czerwonka
Last Updated June 8, 2026
There are hundreds of time clock apps on the market, but not every option is right for every team. Some are designed for freelancers, some are built for businesses looking to track their employees’ time, some cater to different types of work environments, and some cater to specific industries.
Given all of the differences, there is no one “best” time clock app for everyone. There’s only the one that’s the best for your business’s unique needs.
With that in mind, we’ve compiled this list of the nine best time clock apps, specified which type of businesses each is best for, highlighted each option’s unique features, and compared pricing across all of the options to help you find the best fit for your specific needs.
| Platform | Summary | G2 Rating | Free Trial | Starting Price |
|---|---|---|---|---|
| Buddy Punch | Best for businesses with hourly employees who work at multiple locations, Buddy Punch is an affordable option with lots of features for preventing time theft and reducing labor costs. | 4.8/5 | 14 days | $4.99/user/month |
| Factorial | Best for HR teams that are responsible for payroll, Factorial consolidates tools for time tracking, talent management, project management, and IT management in a single system. | 4.4/5 | Not available | $8/user/month |
| Timely | Best for professional services teams, Timely’s automatic time tracking and memory tracking features capture all billable hours so you can be sure you’re invoicing clients accurately. | 4.8/5 | 14 days | $9/user/month |
| Hubstaff | Best for robust time theft prevention, Hubstaff offers computer activity monitoring and employee location tracking so you can stay on top of what all of your employees are doing. | 4.4/5 | 14 days | $4.99/seat/month |
| Harvest | Best for freelancers and independent consultants, Harvest combines time tracking, expense tracking, and invoicing into a single system and integrates with 60+ other tools. | 4.3/5 | 30 days | Free for up to two projects; paid plans start at $9/user/month |
| 7shifts | Best for restaurants, bars, and cafes, 7shifts integrates with your POS system to turn it into a time clock kiosk that employees can use to clock into and out of work. | 4.5/5 | 14 days | Free for one location and up to 15 employees; paid plans start at $39.99/location/month |
| LawBillity | Best for legal services businesses, LawBillity combines time tracking with client invoicing, creating invoices in LEDES formats and utilizing UTBMS patent billing codes. | 4.3/5 | 14 days | $33.60/user/month |
| Rize | Best for personal productivity monitoring, Rize uses AI to categorize tasks and includes timers and distraction blockers to help you figure out how to get more done in less time. | 4.8/5 | 7 days | $9.99/month for individuals; $16/seat/month for teams |
| MedFlyt | Best for home healthcare companies, MedFlyt is a HIPAA-compliant time tracking and scheduling app that includes EVV and a caregiver to case matching algorithm. | Not rated | Not available | $7.50/caregiver/month |
1. Buddy Punch – Best for businesses with hourly employees who work at multiple locations
Buddy Punch is an easy to use and affordable clock-in clock-out app that’s perfect for small businesses with hourly employees. Its strength lies in providing flexibility and accountability for nontraditional work environments — such as mobile, remote, or multi-location teams — with features like GPS tracking, geofencing, and mobile apps that ensure employees can track their hours no matter where they work.
Office-based employees can clock in and out using the Buddy Punch web app (or enter their hours manually using duration entry). In-person employees can clock in and out on a tablet used as a time clock kiosk. Field employees can clock in and out using the Buddy Punch app on their mobile phones. Employees don’t need unique email addresses for you to create accounts for them in the system.
If time theft is a problem for your business — or if you suspect it might be — Buddy Punch has lots of features that prevent it. You can turn on geolocation or GPS tracking to see where employees are located while they’re working, or you can set up geofences or IP address locks to prevent offsite punches. Photos on punch requires employees to take a photo when clocking in and out, preventing buddy punching.
Other features help you reduce labor costs and track attendance. You can set up overtime alerts to get a notification when an employee is nearing overtime, set up punch limiting to prevent early clock-ins, and view detailed attendance reports showing late clock-ins, early clock-outs, and missed shifts. These features make it easy to keep track of your team even when you’re not all working at the same location.
When it’s time to run payroll, Buddy Punch makes the task easier and faster than ever. You can download reports that are formatted perfectly for your payroll provider, set up an integration with your payroll system to transfer the data automatically, or use Buddy Punch’s built-in payroll service. Buddy Punch Payroll calculates everything for you automatically and sends employees their wages via direct deposit or check.
Beyond time tracking and payroll, Buddy Punch can also be used for PTO tracking and employee scheduling. Set up PTO accrual rules to calculate and distribute PTO automatically, and create work schedules quickly with recurring shifts and location assignments. Employees can see their PTO balances and schedules in the app at any time, reducing the number of questions you have to answer.
Pros
- Lots of features for preventing time theft and keeping track of distributed employees
- Includes features for time, attendance, PTO, and location tracking, plus work scheduling
Cons
- No free plan
- No computer activity monitoring features
Pricing
Free trial available. View Buddy Punch’s current pricing.
Learn more about Buddy Punch
- Start a free trial — no credit card required
- View pricing
- Watch a video demo
- Take an interactive product tour
- Request a personalized demo
2. Factorial – Best for HR teams that are responsible for payroll

If your HR team is responsible for running payroll at your business, Factorial is a good option to consider. It combines time tracking, payroll, talent management, expense management, and IT management in a single system, making it a one-stop shop for all HR responsibilities.
When it comes to time tracking, employees can log their hours using a computer or mobile phone, or you can set up Factorial’s Slack integration to let them log their time directly in Slack. When there’s a time tracking discrepancy, the system sends notifications to managers or admins so issues can be resolved quickly, and timesheets automatically sync to Factorial’s payroll system when it’s time to run payroll.
Designed more for salaried than hourly workers, Factorial doesn’t offer quite as many time theft prevention features as Buddy Punch. However, it does offer project management in addition to time tracking, which lets you not only plan the projects your team is working on but also have them attach their hours to projects and tasks, making it easier to see what employees are spending their time on.
In addition to time tracking, Factorial offers several other features for HR teams. There’s an applicant tracking system you can use for hiring, a performance management module for conducting annual performance reviews, a training management system where you can publish courses and track certifications, and onboarding and offboarding features that help with transferring knowledge.
Finally, Factorial’s IT management module can be helpful for HR teams that are responsible for managing equipment and software access. You can order new equipment through the system and specify where it should be sent, track who has all of your equipment, and wipe devices remotely. Additionally, you can provision and revoke access to any software your company uses via integrations or custom SAML.
Pros
- The all-in-one system handles many functions HR teams are responsible for
- Combined time and project tracking provides detailed insights into where time is being spent
Cons
- There’s no free trial, so you can’t test the platform before talking to Factorial’s sales team
- The cost of the different features in Factorial isn’t specified, so it’s hard to compare its pricing with similar tools
Pricing
No free trial offered. View Factorial’s current pricing.
3. Timely – Best for professional services businesses
If you run an agency or consulting business where you have employees working on tasks for multiple clients, Timely might be the right option for you. It captures every second of your employees’ work days, ensuring no billable time goes unbilled. Employees can track time by project, client, and task, and the platform automatically prompts employees to complete their timesheets when needed.
Timely runs in the background on your employees’ devices and captures all of their digital activities. Then, its AI categorizes and organizes these activities into projects and tasks automatically, letting your employees track their time without manual input. This helps ensure you’re billing clients accurately; you no longer have to rely on employees remembering exactly what they were working on when.
If manual input is needed, employees can use Timely’s memory tracker to see what apps/URLs they were viewing at different times of the day so they can go back and figure out what they were working on during periods when they forgot to log their time — or when the AI didn’t automatically log the time accurately.
Beyond time tracking, Timely also lets you set budgets and timelines for projects. You can track how much time has been spent relative to the budget and receive alerts if you are close to exceeding these limits. You can also see the available capacity of each team member to balance workloads, see who’s free, and prevent burnout.
Finally, unlike other tools that monitor what employees do on their computers and share that data with management, Timely’s privacy-first approach allows employees to share their monitoring data only if they want to. However, there are AI features in the tool that help you increase productivity, showing you insights like what unbillable hours are being spent on and where meeting creep is impacting your labor costs.
Pros
- Automatic time tracking ensures no billable hours go unbilled
- Privacy-first tracking doesn’t make employees feel like they’re being micromanaged
Cons
- No computer activity monitoring for catching time theft
- Getting access to overtime tracking significantly increases the per-user cost of plans
Pricing
Free trial available. View Timely’s current pricing.
4. Hubstaff – Best for robust time theft prevention
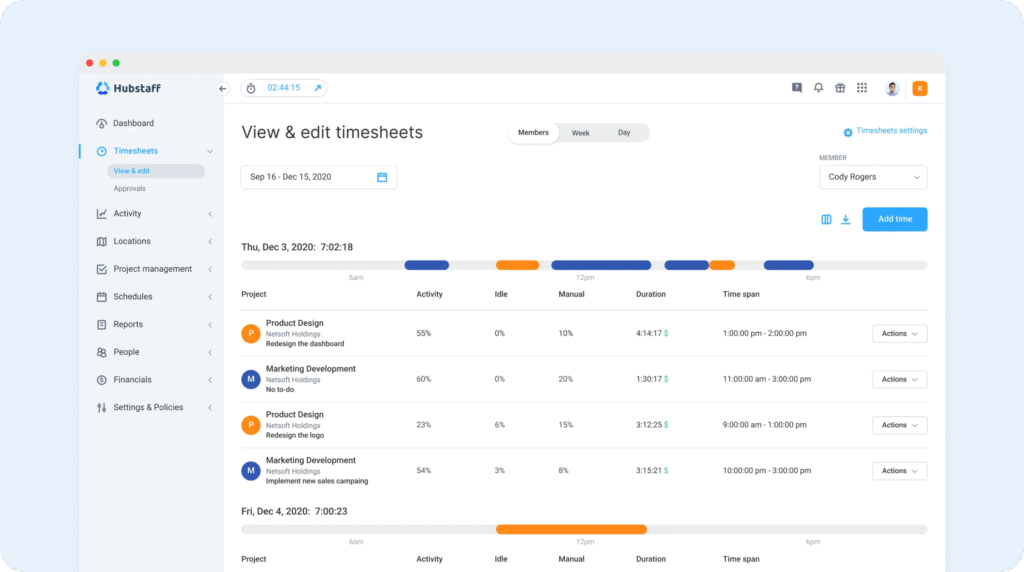
Hubstaff is unique in that it offers time theft prevention features for both computer workers and field workers. For field workers, it has real-time GPS tracking and geofencing so you can make sure everyone was at the right place at the right time. And for computer workers, it offers features like idle detection, app and URL tracking, and automatic screenshots.
With idle detection, you can see when employees are logging time but not actually doing anything on their computers. With screenshots, you can take random screen captures of employees’ computers to see what they were looking at when the screenshot was captured. It also has app and URL monitoring that lets you see exactly how much time employees are spending on time-wasting activities.
For field workers, real-time GPS tracking shows you exactly where your employees were located over the course of the day. However, you won’t get access to some of the time theft prevention features you’ll find in apps like Buddy Punch. Geofences can be used for automatic time tracking but not preventing offsite punches, and there are no facial recognition or photo clock-in features for identifying buddy punching.
If employees forgetting to clock in and out is a problem, you can use Hubstaff’s automatic time tracking feature to trigger clocking in and out based on computer usage. When an employee starts using their computer, it clocks them in, and when they stop using it, it clocks them out.
For field employees, geofences can be used to automatically clock employees in and out. After clocking in for the first time at the beginning of a shift, the app can then use the locations employees travel to to clock them into and out of specific jobs/projects based on the locations they’re visiting.
In addition to GPS tracking and geofencing for field services teams and idle detection and URL tracking for computer-based teams, Hubstaff also offers project tracking for teams that bill customers by the hour and HIPAA compliance for healthcare companies. It truly offers every possible time tracking feature you might need no matter where or how your team works.
Pros
- A robust selection of features makes the app effective for many different types of working models
- HIPAA compliance is available on the Enterprise plan for healthcare teams that need it
Cons
- Employees may feel like activity monitoring is an invasion of privacy or extreme micromanagement
- Adding Hubstaff’s location tracking features more than doubles the app’s per-user cost
Pricing
Free trial available. View Hubstaff’s current pricing.
5. Harvest – Best for freelancers and independent consultants
Harvest is a combined time tracking and invoicing tool that makes it easy to track every second of time you spend on client projects, send them invoices quickly, and accept payments directly through your invoices. It has a free plan for freelancers with a small number of clients. However it only allows you to track time toward two projects, so if you need more than that, you’ll need to subscribe to a paid plan.
Harvest turns your to-do list into tasks with timers right on them. Each to-do is attached to a project and client, so all you need to do to track your time toward them is start the timer. When you need to switch to a different task, start the timer on that task, and tracking on the previous task stops automatically. All of your time data is sorted into tasks within your projects so you can create detailed invoices for your clients.
When it’s time to invoice your clients, you can instantly transform your timesheet into a detailed invoice that automatically calculates your total time and breaks it down into the exact time you spent on each task. Harvest also has expense tracking, so you can easily add any expenses to invoices too. And Harvest also has built-in payment processing so your clients can pay you directly through Harvest’s invoice.
While it’s possible to use Harvest as a combined project management and time tracking tool, it also integrates with many other apps if you prefer to use a different project management system, You can pull clients, projects, and tasks in from apps like Asana, Trello, Basecamp, GitHub, and Jira, and any new changes you make in those systems will automatically sync to Harvest once the integration is set up.
Other Harvest integrations let you start timers from the systems you’re already working in. For example, you can connect Harvest to Slack, Zendesk, or Notion, and Harvest timers will appear directly in those apps so you can track your time there. The time data you collect will automatically pass back to Harvest so you don’t need to keep multiple tabs or systems open while you work.
Pros
- There’s a free plan available for freelancers working on a limited number of projects
- You get time tracking, project management, expense tracking, and invoicing in a single system
Cons
- The free plan is very limited, so you’ll most likely eventually need to upgrade to a paid plan
- There’s no automatic time tracking, so you have to remember to start and stop timers
Pricing
Free plan and trial available. View Harvest’s current pricing.
6. 7shifts – Best for restaurants, bars, and cafes
7shifts connects time tracking directly to scheduling, tip pooling, and sales forecasts. It also flags clopenings, which is something outside the scope of most time clock apps. Its features hold up well against the competition, but the industry-specific extras make it the best for anyone slinging dishes and drinks. It can keep pace with the Friday dinner rush and still help you get payroll out on time.
7shifts lets you track time by integrating directly with your point-of-sale (POS) system, turning it into a time clock kiosk employees can use to clock in and out. Early punches and late arrivals trigger automatic notifications that are sent to managers, and 7shifts includes punch audit reports that let you see exactly when and where someone punched in so there’s no fudging the numbers.
If you need to trim labor on a slow night, managers can see who’s on the clock in real time and send people home before overtime hits. 7shifts also knows when someone’s dipped into overtime or skipped their meal or rest breaks. It alerts you automatically so you keep your budget in the black and stay on the right side of labor laws.
Tip calculations and distribution can also be handled automatically within the 7shifts app. There’s lots of different ways to set up tip sharing: pool tips across the whole restaurant, split them up by section, or separate them between the front and back of the house. It’ll even pay those tips out directly to employees’ bank accounts for you.
Finally, 7shifts makes it easy to build a schedule, accommodate shift swaps and shift splits, avoid clopenings, and differentiate back-of-house and front-of-house roles. The app can analyze your restaurant’s trends to suggest staffing needs while keeping you compliant with local labor laws.
Once the schedule is built, 7shifts lets you share out those schedules directly to your team in the app. If schedules change (and they will), it’s easy to pivot on the fly and keep everybody updated on the new plan. Employees can drop shifts, bid on open shifts, and submit time off requests with just a few clicks.
Pros
- Restaurant focus keeps every feature of the app designed for the way food service teams operate
- Integrates with 36 different POS systems so you can use your POS as a time clock kiosk
Cons
- Restaurant focus makes it less ideal for businesses operating in other industries
- Built-in payroll and payroll integrations are only available on 7shifts’ most expensive plans
Pricing
Free plan and trial available. View 7shifts’ current pricing.
7. LawBillity – Best for lawyers, attorneys, and other legal services businesses
LawBillity is a time tracking app built specifically for lawyers and legal services businesses. It lets you track the exact amount of time your lawyers, paralegals, and office administrators spend on specific clients, and features like its conflict checker, LEDES invoice formats, and UTBMS patent billing codes make it easy to follow the standards of the legal industry.
Set up your clients and matters in LawBillity, then start timers when working on those projects to track the time you spend on them. If something interrupts you — like a phone call or another member of your team coming in with a question — you can start a second timer in one click, which automatically pauses the first one. This makes it easy to track the exact amount of time you need to bill for, even when you spend the whole day multitasking.
If you don’t want to use timers for tracking your time, you can also update your timesheets manually. And if you’re worried about time theft among your team members, features like GPS tracking and geofencing let you see where employees were when they clocked in and prevent offsite punches. These features can also be helpful if you travel for work and need to look back and see where you were at a specific time.
You can also set up alerts to help keep things moving along as they’re supposed to. Create an alert to remind employees to fill out their timesheets before you process payroll, or get a notification when someone starts logging overtime hours. There’s also a feature for timesheet approvals if you want managers to review their employees’ timesheets and make sure they’re right before running payroll.
When it comes to invoicing clients, LawBillity automatically copies entries from your timesheet over to an invoice that’s in LEDES format and contains UTBMS patent billing codes. You can also track your expenses in LawBillity and include those on your invoices automatically. Clients can pay directly through your LawBillity invoices, or you can integrate with LawPay or QuickBooks for payment processing.
Pros
- Focus on legal teams gives you access to industry-specific features you won’t find in other apps
- Combines time tracking with invoicing so you don’t have to transfer data between two systems
Cons
- One of the most expensive options on the market
- Legal focus makes it less ideal for businesses in other industries
Pricing
Free trial available. View LawBillity’s current pricing.
8. Rize – Best for personal productivity monitoring
Rize is designed to maximize the productivity of founders, freelancers, managers, and anyone else who wants to build better habits and improve their workflows. The tool automatically captures your time based on what’s in your desktop’s window, then categorizes that time based on what you’re looking at. If you open GitHub, it marks that time down to coding. Working in Asana allocates time to task management.
Rize relies heavily on AI to categorize and describe your work throughout the day to minimize how much time you spend manually allocating that time. It also provides regular reminders to take breaks so you can focus sustainably all day long. It’s lightweight, hands-off, and affordable for individuals who need some basic features to keep them accountable without adding another item to their to-do list.
It also has some interesting approaches to measuring your productivity. Based on your activities, it can tell you more about your work rhythms so you can hone in on the most productive parts of your day and schedule difficult work for when you are likely to be dialed in.
Fans of Pomodoro and other time-based productivity techniques will like Rize’s timer, which lets you create timed sessions for focus work, meetings, or breaks to help with your day’s structure. There’s also a distraction blocker that lets you remove temptation completely by blocking access to specified applications and websites during certain times. You can also limit your usage of those apps/sites during the day.
If you’re an employer looking to give your team ways to improve their own productivity, team plans are also available. Like Timely, the data is only available to employees and isn’t used to share all computer activity with management. It does offer tracking by project, however, so you can see how much time is being spent on client projects for invoicing and limiting time spent on non-billable tasks.
Pros
- AI categorization makes it easy to see exactly where your time is going
- Pomodoro timers, distraction blockers, and productivity reports help you get more done in less time
Cons
- Both individual and team plans are among the highest-priced options on the market
- Project time tracking is available, but you’ll have to use a separate system for invoicing
Pricing
Free trial available. View Rize’s current pricing.
9. Medflyt – Best for home healthcare companies

Medflyt is an employee management platform precisely tailored to the needs of home healthcare. Its workflows take HIPAA into account, and its file formats are HHS friendly. While it may not be the most powerful clock app on the market, it is the one that knows its audience best.
At the heart of its app is Electronic Visit Verification. It collects data about who the caregiver is, where they are located, the patient, and when the service started and ended.
Medflyt uses Electronic Medical Records to digitally document every caregiver visit. Caregivers write notes directly in the app — information like what care they provided and a patient’s outcomes. Then, Medflyt uses Value-Based Payment tracking to analyze patient care and improve both outcomes and payer rates.
Medflyt uses a proprietary algorithm to match caregivers to cases. When caregivers open the app, they can see what cases are available. After they select their cases, the tool uses data like skills, certifications, availability, and location to select the best caregiver among those who responded.
Medflyt finds the closest cases and lets caregivers select the most convenient jobs so they don’t spend their entire workday in the car. The app automatically identifies patients that don’t require long visits, then aggregates multiple short visits in one area and offers them to caregivers.
Finally, when it comes to onboarding new caregivers, you can quickly send all the forms and questionnaires you need through the Medflyt app. A handy dashboard helps you follow a candidate’s progress, while automatic notifications keep caregivers on task and moving through the funnel.
Pros
- Lots of features built for the unique needs of home healthcare
- The app is HIPAA compliant
Cons
- While per-user pricing is reasonable, there’s a one-time setup fee of $2,500 to use the app
- You have to pay for a minimum of 50 users even if you don’t add 50 users to the system
Pricing
No free trial offered. View MedFlyt’s current pricing.
Choosing the best time clock app for your needs
Hopefully this list of the best time clock apps helped you compile a shortlist of options to consider. Here are some tips on how to narrow that list down further and find the best option for your team:
- Determine which features you truly need: In general, the more features you get in an app, the more it will cost. Take a look at our article on time tracking software features and create two lists: must-have features and nice-to-have features. Remove any apps from your consideration that don’t include all of your must-have features.
- Consider your budget: Once you have a list of apps that all contain your must-have features, you can consider pricing. Remove any apps that are too expensive for your budget. From there, you can narrow the list further by looking for the apps that offer the highest number of features from your nice-to-have list.
- Test drive the software: Once you’re down to 2-3 apps, you can start free trials of the software. Get a few people from your team to help you try the app and make sure it’s easy to use and does exactly what you need it to do. The easier the app is to use, the easier it will be to get everyone to use it.
By the end of your free trials, you should have a good sense of which time clock app will be the best fit for your needs.

